
Blog
How to setup HTTPS on Ubuntu Server running Nginx for Free

Linux, Server Management
How to setup HTTPS on Ubuntu Server running Nginx for Free

Introduction
These days browsers are taking up security more seriously and they actually should. Using a bad browser is as good as inviting a hacker into your home. A great step which most big companies like google are taking is making https mandatory. That is great news. However, https adds up to the hosting cost and the certificates are not cheap if you need it for multiple domains. That is where Certbot comes to the rescue.
It is currently free and will generate a certificate valid for 90 days. After 90 days you can either manually renew the certificate or set up a cron which I will also show below.
Step 1 : Install Certbot
Before we do any installation on linux, it’s always a good idea to update the system. Run the below command to update the system references.
sudo apt update
Next we will install certbot by executing the following command. During the installation process you will be asked if you wish to continue. Just type “Y” and hit enter.
sudo apt-get install certbot
Finally install the certbot nginx plugin by executing the following command:
sudo apt-get install python3-certbot-nginx
Step 2 : Configure the firewall if enabled
Since you would be running this on a server, most probably. So you may have a firewall which is enabled. There is a high possibility you will be using UFW.
To check the same, run the below command:
sudo ufw status
If you get something like below with status saying as “active”, then you have a firewall which is enabled.
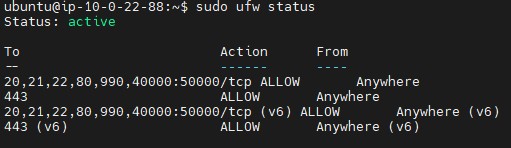
If you get active then follow the below steps:
A. Check if port 443 is exposed: In the above screen see under the “To” heading you will find a list of ports. Check if 443 is there. If not then you will need to add port 443 as HTTPS works by default on port 443. Run the below command:
sudo ufw allow 443
B. Restart the Firewall: Like any other service on ubuntu, if we make any settings changes we need to restart the service. Enter the below command
sudo service ufw restart
C. Recheck the Firewall: Finally recheck the firewall to check if now you have port 443 showing under the “To” option by again running the UFW status command.
sudo ufw status
D. Give a pat on your back: Yayee! you have configured the firewall to allow port 443 successfully.
Step 3 : Generating the certificate
Great! Now we have setup certbot to be able to issue a new https certificate and setup the server to deliver content over https via port 443. Time to generate the actual certificate. Execute the below command and remember to replace [yourdomain.com] with your actual domain name.
sudo certbot –nginx -d [yourdomain.com]
Restart the nginx service
sudo service nginx restart
If all is good, then you will get a screen with “Success” written among all bunch of texts. Something like below

Step 4 : Test the deployment (Obviously)
Open your favourite browse, (Mine is internet explorer 😜). In the browser enter the domain with https. The site should be now running safe and secured on https.
Step 5 : Setup the cron to renew the certificate automatically
Execute the below command to edit the cron configuration file:
crontab -e
In the file that opens, add the below line right at the end.:
0 12 * * * /usr/bin/certbot renew –quiet
Save the file.
We will setup the command to run at noon every day. This command will check if the certificates are about to expire and will renew then them as needed. The –quiet command tells certbot to not generate any output as we are in cron and will not obviously not see the output. There are methods of seeing output like writing to log but lets not get into this now.
Step 6 : Take the rest of the day off
Cause You Deserver It
About Kaustav
I have decades of experience is software development using .Net Technologies, PHP and wordpress. I love coding and discovering new tech.

You may also like

Server Management
Fix Ubuntu Terminal Tab Completion Not Working (Easy Guide)
Feeling frustrated with missing tab completion suggestions in your Ubuntu terminal? Don’t worry, this guide will walk you through a series of troubleshooting steps to get things back on track. 1. Install or Reinstall the bash-completion Package Tab completion functionality heavily relies on the bash-completion package. If it’s missing, run: If it’s already installed but […]

Linux, Nginx, Wordpress
Increasing WordPress File Upload Size by Updating php.ini File for PHP-FPM on Nginx Server
Many WordPress users encounter frustration when trying to upload large files to their websites, only to find that they exceed the default file upload size limit. However, fear not! There’s a straightforward solution to this problem: updating the php.ini file for PHP-FPM on an Nginx server. In this guide, we’ll walk you through the process […]


0 Comments
Be the first to comment